Tuesday 1 June 2010

Project overview

Project overview

Thing I learnt and achieved……

Clean Topology and edge flow.

The main objective for this project was to create another character for my show reel, concentrating on organic modelling. I wanted to create a character that was my basis of learning topology and model by using the least amount of Polys, creating characters from basic geometry and adding faces, UVs etc if needed. I remember looking at a tutorial of a hand and discussing with Clym how cool it was that a hand was constructed by just a couple of shapes and getting the shape right rather then smoothing it out by increasing polys. We then went through some Disney animations to look at the construction. So I decided that this would be my main focus. The previous character model - (Willy), was mostly made by using nurbs. The character was really stylized not at all life like (when I mean life like I mean similar to characteristics of humans).

Objectives

1. Heads up display – object detail – poly count – trying to model with the least amount of polys as possible. Split polys.

2. Understanding muscle formations so you can get a good edge flow.

3. Emulates muscle construction.

4. Has to be animatable.

This has been a fun but challenging project. I wanted to push my modelling skills further and more advanced. Even though modelling was achieved by basic shapes, time was spent creating clean lines and understanding or shall I say problem solving to what method is going to work best…for example the jacket on Jack was modelled at least 2/3 times before I was happy with the result. Constantly trying to better the style at each attempt I wanted to create human characteristics but stylized like the hands and face. To give Willy that real Nerdy Enthusiastic look I made his eyes dominate the face Even though the easy option was to just cover half his face with large war type goggles. I wanted to model the eyes so I can understand the construction and go through the technique…a technique that was a bit of a nightmare, as I wasn’t happy how the eyes looked…. some deformations occurring…didn’t have time to sort out so will do over the summer.

Changes in Brief

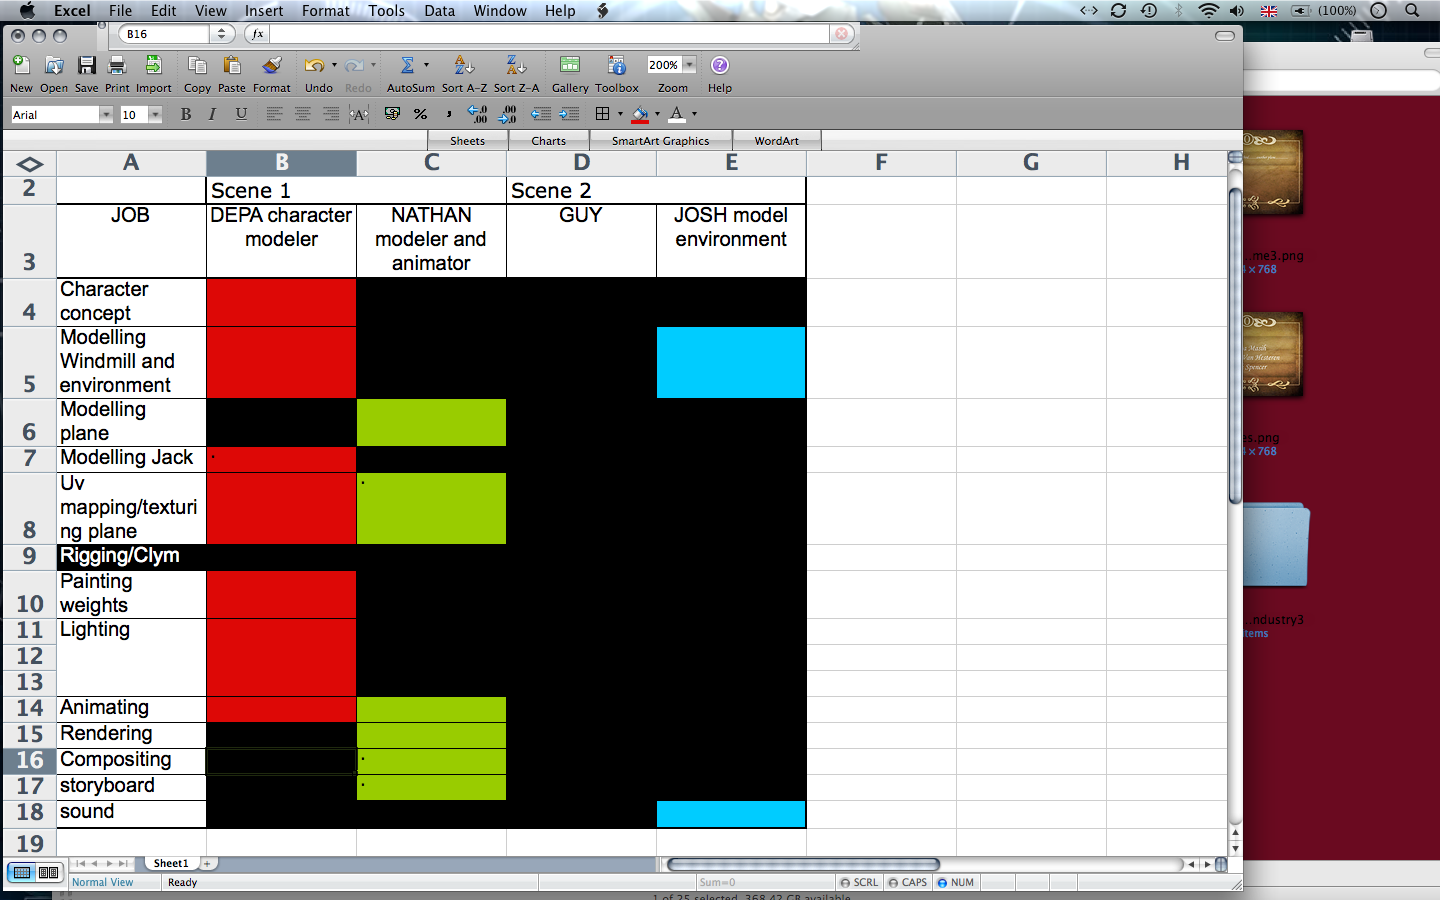
It was always going to be challenging to complete this animation with designing, modelling, rigging and animating a character along with modelling the environment in five weeks ready for rave live. Even though we didn’t meet the deadline I feel that the process was a fantastic learning curve. One mustn’t underestimate the length of time to complete these tasks! I think again more time needs too be set aside texturing, rigging and painting weights.

The animation, (scene 1) did not change that much as Jack was never going walk…The scene is pretty much to the original design the only difference is that the second scene was partly finished as we were one man down due too unforeseen circumstances. So we compromised and put Josh windmill and rocky terrain into the first scene.

As I did not get time to rig or paint weights on my character I am aiming to model, texture rig and animate Cornelius (character I designed in the first term) so I can animate the original zoo scene. Willy original character I designed and modelled is now complete.

I am pleased that I started to learn how to texture. Thank You to Mario’s for helping me with that…. He’d make a good teacher! And the best Chinese spare ribs……I will continue learning to texture in the summer

Working in a group

This has been a tough term with so many things going on. Finishing work for show reels and trying to do this animation for Rave Live as well as learning DVD Pro and producing a show reel. I’m probably more laid back with this project, as I am getting more confident with what I am doing.

At first we all seemed to know what we were doing and the original idea came from chatting to Nathan on Msn. I later realised it was Clyms idea…in any case the idea was good enough for us to execute. We didn’t nominate a director etc just had a couple of meetings where we discussed what needed to be done and then everyone was left to get on with it. The only problem was, there were long spells of not being able to get in contact with anyone from the team, which led to not knowing what was going on. When we did hook up everyone just got on with what they had to and complete the animation. Since we are a strong team we managed to achieve what we wanted and am happy with the results…I love the effect of the final animation and it was really good fun when we all really got inspired with the silent movie effect.

Goals achieved

1. Modelling new character for show reel

2. Finished Willy character fro animating for show reel

3. Adding sound to Show reel

4. Finishing 2D work for show reel

5. Logo modelled and animated in Maya and post production final cut

6. Learning advanced muscle formations and rotations

7. Confident with all the members in the team to get job done

8. Meeting production criteria

9. Reduce artwork for rave live

10. Texturing UV Mapping

To Achieve in summer

1. Finish first animation concept from first Industry Exercise. Model Cornelius

2. Rig Cornelius

3. Rig Jack with Jacket

4. Texture Cornelius and anything I can model

5. Paint weights on Cornelius and Jack

The above are a few important tasks I would like to achieve during the summer break.

Please see my show reel blog on:

http://depashowreelindustryexercise3.blogspot.com/

Monday 24 May 2010

Changed Job allocations

Some of the original job specs have been modified due to changes wihin the group.
  1. First scene in the air
  2. second scene on ground.
Being one man down we decided to combine scenes so the windmill and rocky terrane was implemented in the same scene as the plane flying across.


Sunday 23 May 2010

Animating........


Start work on animating......serious lagging going on making animating really difficult. every time the graph editor was selected it would have cut out imagery of the scene pasted over the editor. so the editor had to be opened as a separate window to be able to work on. The scene was difficult with both character and plane selected Maya just would not let me animate.....really lagging....So we had to first animate the plane then import the character then parent the character to the plane......we had problems with parenting. Maya would not parent the plane and the character after many attempts we just animated seperatly. Also when the character was selected and parenting was done. When moving the plane and character jacks rig would just come out. So in the end we had to delete the rig and place Jack in the plane. This still deformed the skin of the character. So in the end we animated pieces seperatly.

Tuesday 18 May 2010

Ideas...Ideas...Ideas


Had a really cool idea......I was driving home after college with Nath and Josh dropping them off when we were listening to a piece of classical music in the car (happened to be on radio 2 at the time).....When a piece of music came on......I suddenly had a brain wave.....what if we do our short clip like a silent movie.....with crackly sound effect and flickering screen. so it looked 20s/30s war type film....guys loved the idea.....so i've just been playing around looking at some text and backgrounds.......the look we wanted was sepia.....

painting weights

Had problems with painting weights. When selecting the painting weights tool the joints did not come up. Even when switching off the deformers. Also tried loading the character on the college computers....still didn't work......damn you......took the original model that clym had rigged and the joints were at last showing.......could be that the faulted character had been combined and history deleted in any case at at least I can play with over the summer holidays. We were able to animate the character with the scenes originally decided without the character walking....as stated at the beginning of this project one of my criteria to meet with this project was to design a character working with the toplogy.......The original scenes that Nath had produced in the story board did not need the character to walk.....

Sunday 16 May 2010

Rigged By Clym


Clym is brilliant...He managed to rigg this is 2 and a half hours...thanks buddy.

Thursday 22 April 2010

Some Objectives to look at after Formative assessment with Jared

  • Decision making
  • how you work in a group external client
  • Show reel creativity creative way of how presenting
  • demonstrate bits that go in and why? things missing
  • each stage of how working - systematic pipeline
  • storyboard
  • schedule
  • brief
  • Look at the editors manual
  • write about changes and why write about scope changing deadline met.
  • look at different animations and companies.
  • write about show reel

Wednesday 21 April 2010

Jack


Original design of Jack with the jacket and modified design without jacket.

Feet


Really good fun modelling the feet especially the laces. Using torus nurbs to get the main lace shape. Duplicated...loops of bow made with just pulling points from CVs. Isoparms added to keep geometry. The knot was formed by two nurbs torus and height ratio increased the torus intersected to make a quick knot. C.V.s curve tool used to make lace after bow. circle created then circle shit select profile then surfaces extrude...polygon shape at the path of the shoe profile normals activated then selected the circle and scaled it down.


Sunday 18 April 2010

Modeling hand


Blocking out hand......knuckles and fingernails added. Constructed from polygon cube scaled then positioned to size. I didn't want the character to have large hands as i didn't want it to cartoony. Working out the resolution for each finger to start detail and shape. subdivision added for each finger a face. 4 faces oer finger. Shaping then tapered into cylinder shape. Wrist constructed from polygon cylinder. Keeping resolutions low. Combine mesh, delete history then bridge smooth path. Changed offset to fit the wrist to the hand. Tweaking the shape as the hand is constructed. Too finesse the detail especially fingers and knuckles added resolution and deleted verts that we didn't need. Especially used to create more of a ridge on the finger.

Saturday 17 April 2010

Body


Really not happy with the topology on this Jacket so gonna do another......

Thursday 15 April 2010

Head

Head finished I am pleased with the small detailing like the compression of the fabric to show the tightness of the goggles buckled at the back.

Low polys and smoothed out.......


liking the result of this...finished the head...yeah................now the body.......

cleaning up and detailing....


Cleaning up some of the mirrored geometry and modeling the back of the hat adding clasp band detail.....

Continue modeling......


Sorting out the edge of goggles


Ditched the original idea of bending a plane then attaching it. Above just moving verts to get the shape...not really happy with this either..decided to ditch and start again by using a cylinder to get the shape of the head then moulding and attaching to the existing frame.

goggles......goggles....goggles.....


Trying to create the edge of the goggles......proving to be a bit of a nightmare........Creating the edge of the glass the look will be fur trim edge.

Modeling the Goggles


Constructing the goggles........what a nightmare......kinda going along with a rough idea of geometry but the difficulty was how how I was going to construct the band. I tried just extended existing edges and forming shape....by moulding around the head but this took ridiculously long and I wasn't happy with the result. The goggles I wanted slightly geeky and vintage looking to obtain that the edge of the frame or rather the skin had an unfinished frayed edge to do this I inserted edge loops and extended the extrusion world mode.

Tuesday 13 April 2010

Constructing Hat


Just getting a feel for placing the goggles over the hat. I want the peak of the hat to look as if the goggles are pressing against it.

Constructing Hat